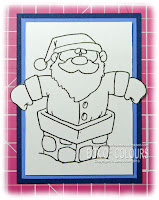
Not sure if "Cut Out" is the best description for this technique but
hey it's what I call it!
Now there are two ways I do this.......
........and I have prepped a demo for both!
OK then, lets get started
Firstly you will need your chosen image and either stamp it or print it out
(don't choose an image that is overly fiddly....simple is best)
NB do all the cutting out BEFORE you colour your image
It is heart breaking to have spent ages colouring only for your hand to slip with the knife or goof with the die cut!!!
CRAFT KNIFE & SCISSORS
STEP 1
Easy bit first
Trim the straight sides (in this case the top and bottom)
With a craft knife cut up to the part of the image you want to protrude over your mount (ie Santa's hand) as I have done on the left hand side.
Then cut around the hand with scissors as demonstrated on the right
STEP 2
Mounting is a little trickier with this method
I have found it best to lay your image on top of your mounting card with the amount of border you want showing on two edges as above.
Then with a ruler as a guide mark with pencil where you want the other two sides cut.
Put your image safely to one side and trim the remaining edges as per your marks.
STEP 3
If like me you prefer a double mount you will be glad to hear the second one is much easier to do
Simply measure or eyeball your second mount so that it is evenly larger than your first.
STEP 4
Here are the three layers put together.
Of course you won't adhere them to one another until you have coloured your image.
You can glue them flat or add dimension with foam squares between the image and the mounts or when you mount the finished topper to your card - the choice is yours!
With me so far?
Righty Ho, lets carry on with the second method:
DIE CUT & SCISSORS
STEP 1
Now, for me this was the trickier method to master!
This time you need to trim around the area you wish to protrude over your mounts first.
But do not cut any card away - just carefully trim around it.
As you can see from the above image you will need to cut around much more of the image than in method one and I will explain why soon.
STEP 2
Although you want the same amount of Santa's hand to show in order for you to fit the die under his hand you need to cut more (to the arrows) otherwise you risk tearing your image.
STEP 3
Once you have cut both sides you are ready to wriggle your die underneath Santa's hands.
It is very important that they are above the die - you do not want to cut them off when you run your die cut through your machine!
I secure my work with Scotch Removable Tape - please do not use normal tape
(any glue residue can be removed with an eraser later)
Now simply run this through your die cut machine.
STEP 4
Remember those extra long cuts?
Turn your image over and stick some normal sticky tape over them.
If you have cut out these parts neatly and carefully adhere the tape you will hardly see the cuts from the front, especially once your image is coloured.
STEP 5
Mounting is much easier - if you have nesting dies, just pick the next ones up and cut them out in your contrasting coloured cardstock.
However, please note that sometimes they are not exact enlargements and if like me you are uber picky then you may well prefer to cut your mounts by hand.
STEP 6
Here is Santa with his die cut mounts.
and for direct comparison:
Knife Method Die Cut Method
Why not give it a try next time you are making a card and remember if using die cuts you don't have to stick to boring squares and rectangles!!!
I hope you have found this tutorial helpful
Please don't hesitate to contact me if you need further assistance
Bye for now


5 comments:
Fabulous tutorial Jane, thanks for sharing.
Sue xx
I vote for the knife cut... Thanks for the tutorial Jane!
Hugz,
Gramma
Fabulous tutorial...
Wouldn't it be nice if you had a members section and we could post our finish projects ....
Love the tutorial Jane.. can't wait for the next one.
Fab tut Jane.
Donna x
Jane your tutorial is awesome I call it over the edge but you can call it what you want when you wrote the tutorial and did such a brilliant job! well done hugs me x
Post a Comment